How to Import PST File into Office 365

If you’re looking for instructions on how to import a PST file into Office 365, this article will be beneficial for you since it will highlight how simply you can import a PST file into Office 365 using tools and manually.
Several people are moving to Office 365 because having an empty inbox is interesting. Whenever you decide to move to Office 365, then you have to transfer your old email. With the help of the PST file, we will import emails to MS Office 365.
There are several ways to import PST into Office 365. Outlook can handle small mails, but big mailboxes need an Import tool such as Azure AzCopy. I’ll cover both approaches in this post.
With PST To Office 365 Converter
Syskare PST Converter. converts PST files to Office 365. This wizard may convert a huge number of PST files. This wizard offers you better control and input.
- Users may export their Outlook.PST file to a variety of formats, including MSG, EML, EMLX, TXT, MBOX, HTML, MHT, Office 365, Outlook for Mac (OLM), Gmail, Mac Mail, Outlook.com, Thunderbird, Yahoo, Windows Live Mail, G Suite, Exchange Server, and Hosted Exchange Server.
- Installation of Microsoft Outlook is not needed to convert PST files.
- Additionally, this wizard exports PST calendars and contacts to industry-standard formats like ICS, vCard, and CSV.
- The Syskare PST to Office 365 converter is capable of converting damaged PST files into healthy ones.
- PST files can be split into 2 GB, 5 GB, and 10 GB parts.
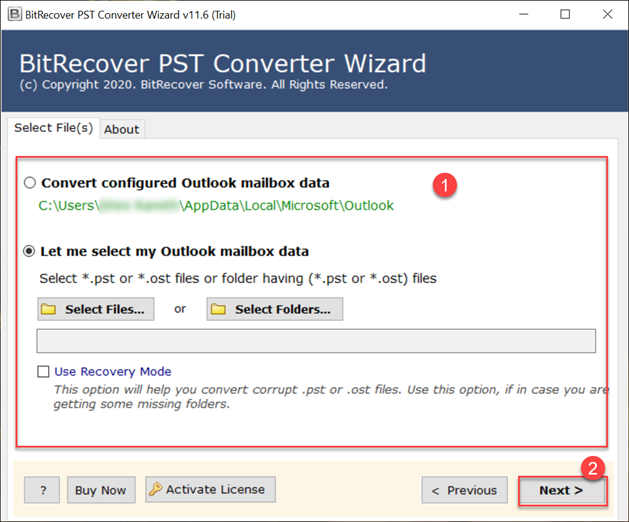
How to Use PST to Office 365 Converter

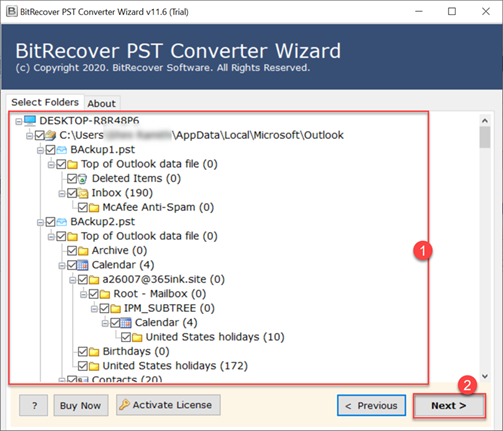
- The first image shows how to import PST to Office 365.
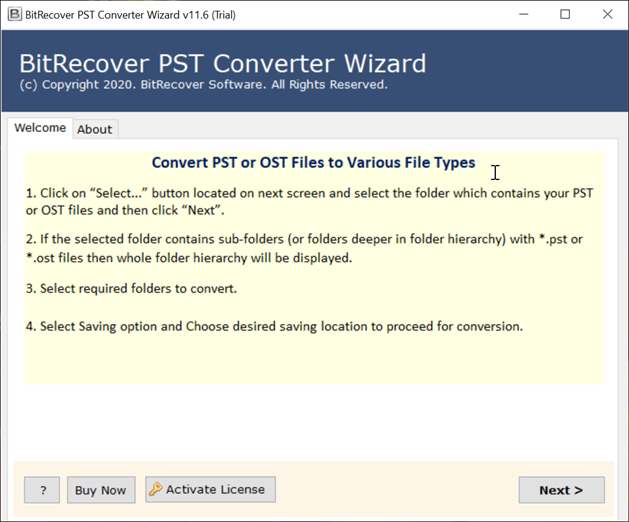
- The software panel offers two ways to upload emails:
- Convert setup Outlook mailbox data (.pst) to Office 365 Accounts Mailbox.
- It has two sub-options:
- Load a single PST file into Office 365 via Select Files.
- Choose Folders: This feature enables you to import numerous PST files to Office 365 at the same time utilizing the Select File feature.
- Using Recovery Mode: This option enables importing damaged PST files into Office 365. This method works well when missing directories occur.
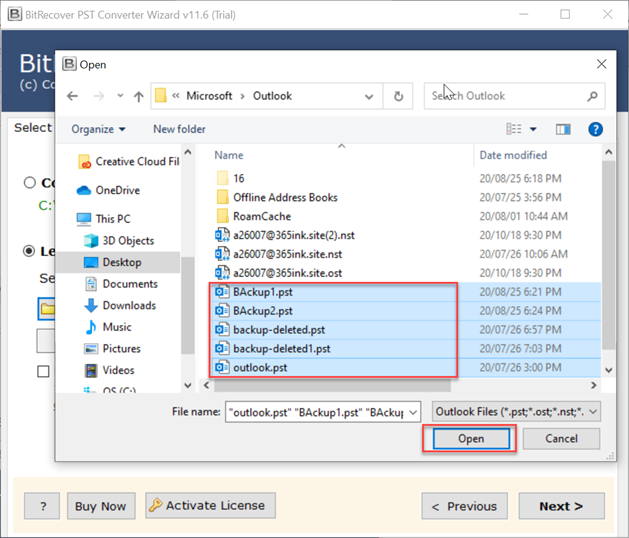
- To open a PST file, select it and then click on the Open button.
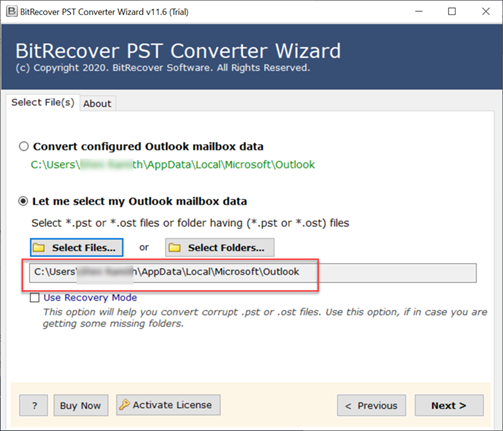
- After seeing the location of the chosen file (s), then click on the Next button.
- Before converting a PST file to an Office 365 mailbox, the Converter tool shows all PST file folders. This option helps users transfer selected folders from PST files to Office 365 User Account. Now press Next.
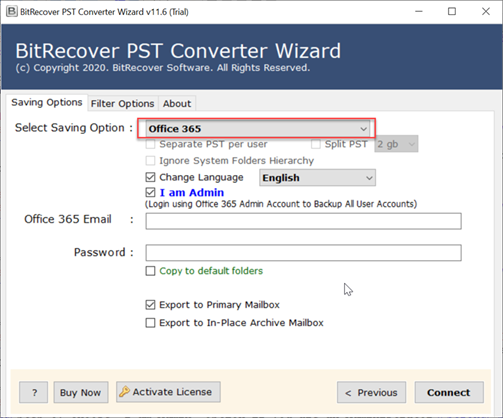
- Select Office 365 as the saving type to import PST.
Modify Office 365 Folder Language: It enables you to change the language of Office 365 Folders to 9 other languages: English. For example, if Language is set to French, Tasks will appear as Tâches and Mailbox as Boîte de réception.
-
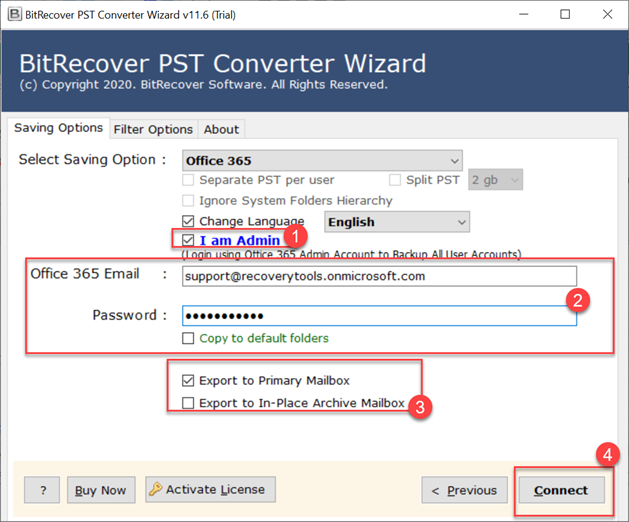
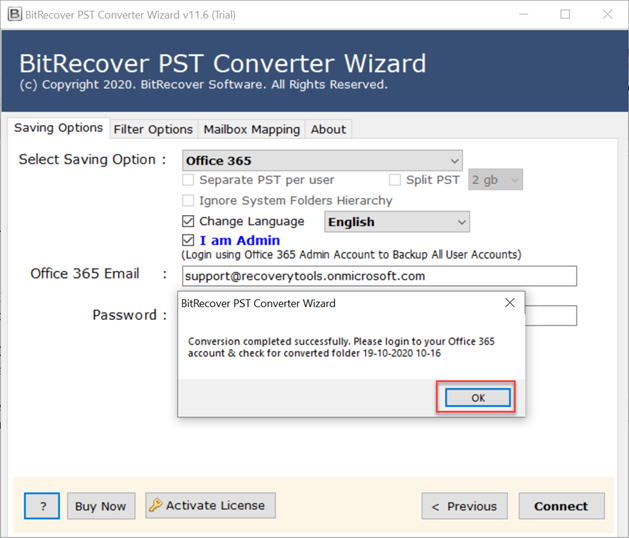
- A PST file may be converted into an Office 365 account by entering the Office 365 credentials (username and password). Don’t worry if you’re not an admin.
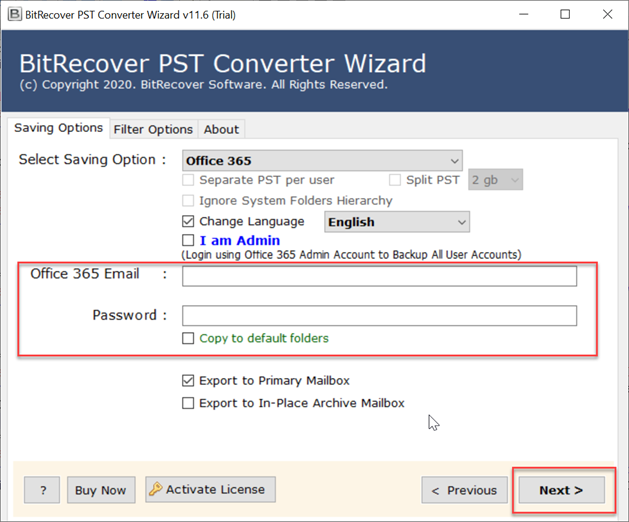
- Files copied to default folders Examine To transfer PST files to default Office 365 Folders, choose this choice. When unchecked, a new folder with date and time will be created in Office 365 Webmail.
- Import PST files to Office 365 Primary Mailbox: That’s a basic mailbox type when you purchase an Office 365 Exchange Online subscription. This is a password-protected mailbox.
- PST files may be imported into Office 365 In-Place Archive Mailboxes using the Download tool (also known as Archiving Online). The Primary Mailbox in Microsoft Office has a unique mailbox. Default deactivated. Each mailbox setting must permit it.
- A PST file may be converted into an Office 365 account by entering the Office 365 credentials (username and password). Don’t worry if you’re not an admin.
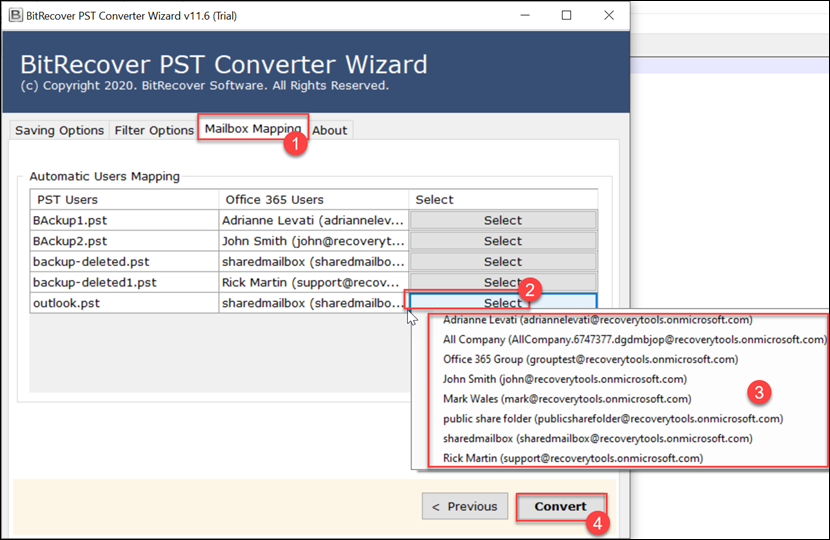
- Now, conduct Mailbox & User Mapping. You may map PST files to Office 365 users via the Mailbox Mapping Button.
When clicked, the Choose icon shows a drop-down selection of Office 365 users to whom the administrator must send PST files. This feature allows users to import PST files to multiple Office 365 users.
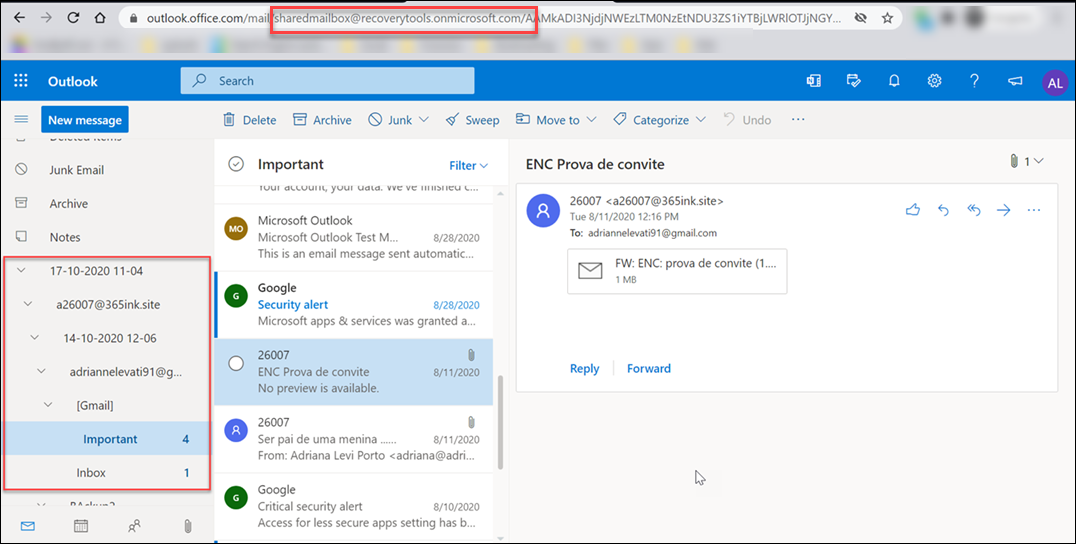
Users may also use this option to import PST to shared mailboxes.
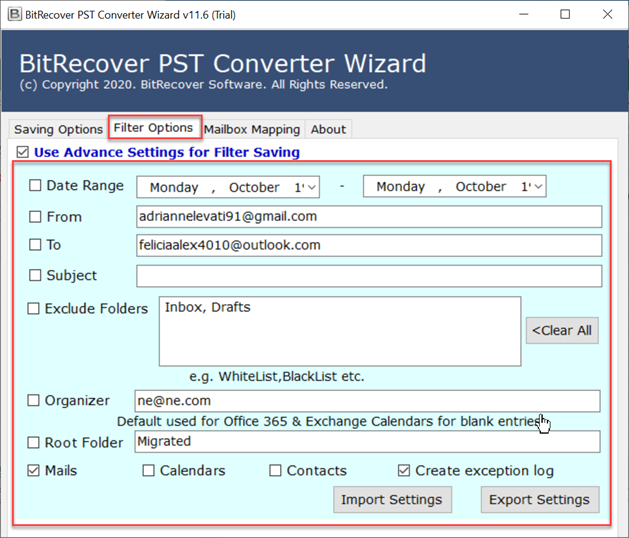
- If you want to exclude folders, organizers, and root folders from importing PST to Office 365 you may do so.
It also allows you to build the Exception Logs. The Exception Report allows users to manage and analyze all program exceptions. This helps monitor the software’s success and failure
- Select on Link up, and you will be able to begin exporting PST files into your Office 365 subscription.

- The procedure has finished.
- Select Outlook.com from your Office 365 account.
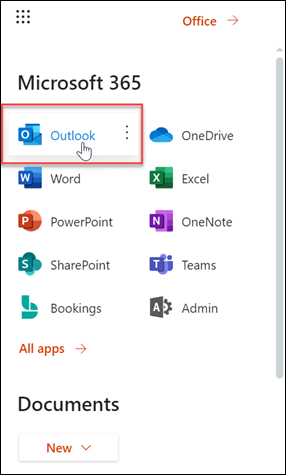
- PST file data may now be seen on Office 365, as shown by the screenshot.
Manual Methos
Using Outlook to Import PST file
The simplest method is to use Outlook to export the PST (personal storage table) file. This technique is suitable for migrating separate or two mailboxes. If you don’t have a PST file, I’ll describe how to generate it from your existing mailbox shortly in this post.
- Select on File in Outlook.
- Now Click Access & Export.
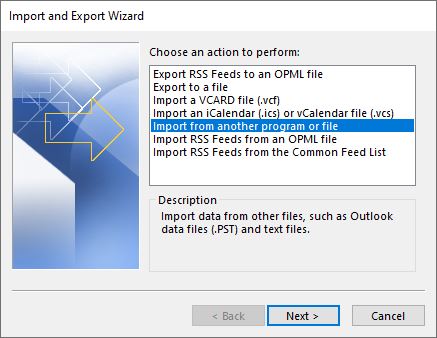
- Then Choose Import/Export.
- Click on Import from another software (default selected).
- Now Pick Outlook Data File (.PST).
- And Choose the import file.
- Then select what to import and where on the main window.
- Complete importing.
If the user’s PST file is huge, it may be taking a while to import. Use this technique for tiny mailboxes with just one or two movers. Should use free Azure services to import large PST files or several mailboxes.
Using Azure AzCopy, to import a PST file into Office 365.
You may however upload them to Azure storage or utilize Microsoft’s drive delivery service to import large amounts of mailboxes. The network post is free, however, it may require some time to post the data.
Shipped data costs about $2 per GB. As a result, it is much more costly but preferable if you need to import hundreds of mailboxes.
Planning
It is necessary to give the Mailbox Export-Import ability to the Global Admins in Exchange Online until we can begin exporting data. However, it may take hours or days for this modification to take effect before it is implemented properly.

- Go to Permits in the Exchange Admin Center (https://admin.portal.com).
- The Continual Improvement job may be found in the admin roles section.
- To specifying a job, press on the + sign.
- Then Choose the Mailbox Import Export function and save.
After 5 minutes, I was ready to start a new Import Job. Log out, shut all Microsoft tabs, and re-enter.
Adding an Import Job
Having access established, we can begin afresh Import Job. Select Info governance > import at https://protection.office.com.
- Export PST Files.
- Fresh Import Job.
- Decide whether to transmit or ship data. We’ll submit it.
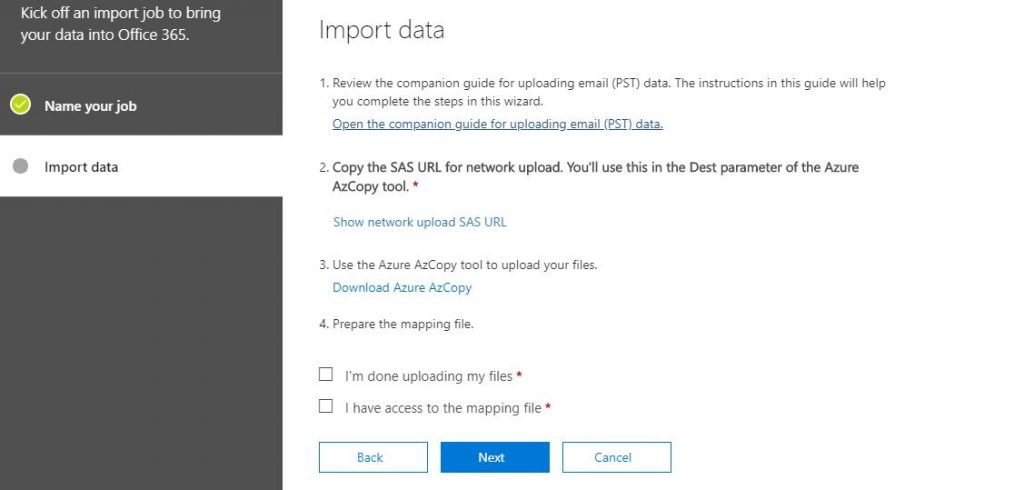
On the page displaying, we can see the SAS URL and a download link for the newest Azure AzCopy utility. Installing Azure AzCopy and copy the SAS Url.
Make the SAS Url secret since it provides you entry to your PST files on Azure.
It’s possible to close the display and return it later.
Using Azure AzCopy to upload the file
Access Azure AzCopy after installation. It is a command-line program for uploading.
You can’t pick and choose which PST files to post. Take care to place the files in a different folder whenever you need to verify them.
To publish files, we will be using the command.
AzCopy copy “/path/to/pstfiles” –recursive=true
Utilize —recursive=true option to indicate recursive mode for PST files stored in subfolders.
If you do not put quotes around the source and destination locations, then will receive a syntax error.
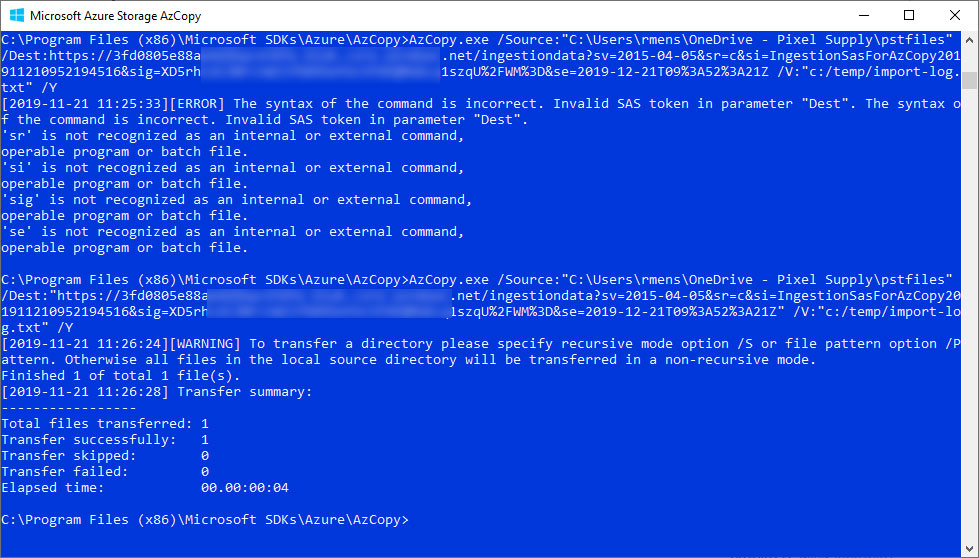
Postscript files take longer to transfer based on the size.
Examining the PST files (optional)
When uploading the files, double-check that all PST files are in Azure Storage. Launch the Azure Storage Viewer.
When opening Storage Explorer, the user must create an account.
- Select Introduce a New account.
- Choose to Use a SAS URL.
- Give us access to the SAS URL that we received from the import operation.
- Continue and Join.
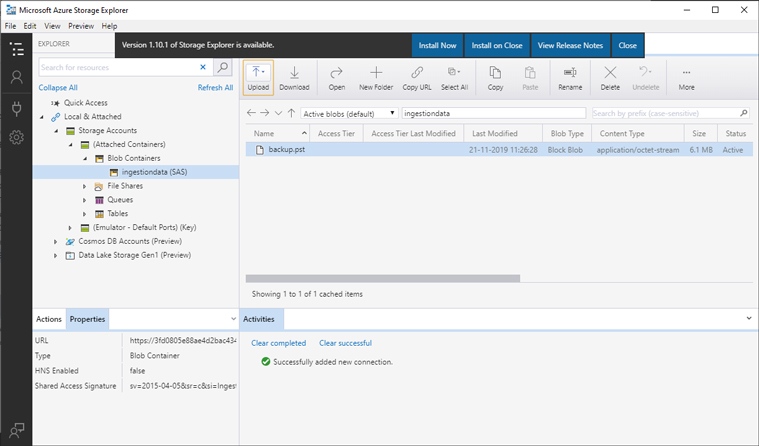
While verifying the PST files, exit Storage Explorer. Ensure certain that you right-click the ingestion data in the browser and choose to Detach to unplug from the server. This will result in an error message when you decide to enter it again.
Using PST File Mapping
The following step is mapping the PST files to the Office 365 mailbox. Utilize a CSV file, which you can get from Microsoft.
There are two columns/parameters in the CSV file:

- Leaving the PST import to the user’s mailbox on Exchange will reduce the burden.
- This FilePath may be left vacant when you just have one PST file. Whether you have utilized subfolders, users must provide the name of the subfolder in this field.
- If the PST file’s name is self-explanatory.
- Is Archive — You may use this function to import a PST file into a user’s online archive folder. True or untrue.
- TargetRootFolder – If left vacant, the files will be exported into the user’s inbox as Imported. Utilize just a / to combine data with existing folders (like inbox and mailed items).
The following fields may be ignored and left blank.
Finished the Import Task.
Once you have mapped all the PST files, we may import them. Start the import task at protection.office.com.
- Choose I finished submitting my files or got the mapping file.
- Then, choose the mapping file (CVS file)
- Verify the CVS file.
- After confirmation, select Save
When you may begin importing, your new import task would be evaluated.
Based on the size, this may take a few minutes or more. Simply restart to see the results.
We may then export the PST file in Office 365.

To begin the transfer, hit Ready to import to Office 365? But on the following page, select Import to Office 365 once.
For example, you may omit any messages with the user in the CC. After sorting, select Import data to start the import process.
A 64 Megabit PST file took 30 minutes to load and the title remained “import in progress” even after that period. The best part is that you can just dismiss the display and arrive immediately.
Import Gmail to PST
Not every email service supports the creation of PST files. For an instance, you cannot import Gmail to PST. The only alternative is to import it to a mbox file or converting it to a PST file using a converter. However, this is inconvenient.
Gmail to PST Export
Not even all mail programs provide PST files. We can’t export Gmail to PST, for instance. The only solution is to import it to mbox and convert it to PST. But this is uncomfortable.
It’s better to apply a Gmail or even another mail supplier’s mailbox to Outlook before exporting PST. Outlook can access almost any mailbox. When opening in Outlook, export to a PST file (or move the files to your new mailbox)
Open Gmail by Using Outlook
In Outlook, go to Gmail and select Accounts. Input the email address you wish to transfer, Gmail users will be prompted to join, while users may choose POP or IMAP.
This can take a few minutes for all messages from the mail server to be downloaded to your Outlook profile.
How to Create a PST File in Outlook?
After downloading all emails, export to a PST file:
- Select File > View & Export.
- Now select Import/Export.
- Choose Export to a file.
- Select for Outlook Data File (.PST).
- Choose the folders to export.
- Then click Complete.
After completing the PST file, import it using one of the ways provided.
Summary
In conclusion, all of the above techniques are effective, although manual approaches have drawbacks, such as just exporting one or two files and taking a long time. However, there is a wizard Syskare PST converter that lets you convert PST files to Office 365, and it is quite a user satisfying.